Here is some tips to setup Cisco Access Server (Cisco 2509 or Cisco 2511) on your lab environment. I hope it help you to save a lot of time. Especially when you go to CCIE Lab testing.
See Access server configuration first below
AccessServer#show run
Building configuration…
!
version 12.2
no service single-slot-reload-enable
service timestamps debug uptime
service timestamps log uptime
no service password-encryption
service udp-small-servers
service tcp-small-servers
!
hostname AccessServer
!!
!
!
!
ip subnet-zero
ip host R1 2001 1.1.1.1
ip host R3 2003 1.1.1.1
ip host R2 2002 1.1.1.1
ip host R4 2004 1.1.1.1
ip host R5 2005 1.1.1.1
ip host R6 2006 1.1.1.1
ip host R7 2007 1.1.1.1
ip host PIX 2011 1.1.1.1
ip host Frame 2016 1.1.1.1
ip host SwitchB 2014 1.1.1.1
ip host SwitchA 2015 1.1.1.1
!
!
!
!
interface Loopback0
ip address 1.1.1.1 255.255.255.255
!
interface Ethernet0
ip address 192.168.1.1 255.255.255.0
!
interface Serial0
no ip address
shutdown
!
interface Serial1
no ip address
shutdown
!
no ip classless
ip route 0.0.0.0 0.0.0.0 192.168.1.1
no ip http server
!
!
line con 0
exec-timeout 0 0
logging synchronous
line 1 9
transport input telnet
end
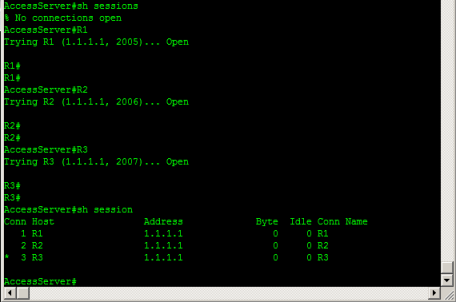
1. From the AccessServer, type ‘show session’, and AccessServer will show all the sessions already opened.
– Type each router/host name such as ‘R1’, ‘R2’ and so on.

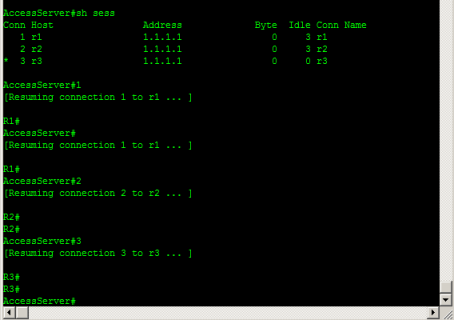
2. After opening all the session, you can login in using connection number #.
– Type ‘1’, bring you to R1 router (in this case)
– Tupe ‘2’, bring you to R2 router (in this case)

3. How to move back to AccessServer?
– click Ctl + Shift + ^ and push ‘x’
Good Luck !


 The www.ipBalance.com runs by a volunteer group with IT professionals and experts at least over 25 years of experience developing and troubleshooting IT in general. ipBalance.com is a free online resource that offers IT tutorials, tools, product reviews, and other resources to help you and your need.

![[Splunk] – Basic search fields and commands logo_splunk.png](https://ipbalance.com/wp-content/uploads/2009/06/logo_splunk-100x80.png)
